2020 UPDATE: The guide below was written back in 2017. While it still may be helpful to some, KeePassXC has changed quite a bit in the last three years, both in functionality and aesthetics (almost universally for the better!). Since this guide may be out-of-date, I’d recommend their new, official “Getting Started Guide”.
Table of Contents
- Level 0: Starting Out
- Level 1: Getting Setup
- Level 2: More Security Tips
- Level 3: Getting Organized
- Level 4: Securing Our Database With Multiple Factors
Appendix A: Verifying Your KeePassXC Download Without Using the Command Line
What is KeePassXC?
KeePassXC is an open-source password manager. As the project owners (of which I am not) put it: It is a community fork of KeePassX, a native cross-platform port of KeePass Password Safe, with the goal to extend and improve it with new features and bug fixes. KeePassXC is open-source, which means its code is public and thus open to inspection by all.
This is a basic guide of how to get started with KeePassXC. This guide is for OS X / macOS users (hereto referred to as “macOS”), though KeePassXC is built to work with Linux and Windows as well, and this guide may be helpful for those users too. Another good resource is KeePassXC’s official FAQ page.
Disclosure of Amateurism
I’m not a security expert or security professional, just a social media editor who manages a lot of accounts, so buyer beware from this point on. If you spot any errors or have any suggestions for this post, feel free to contact me via Twitter or elsewhere.
Thanks to @com for various tips throughout. I’d also like to note that I drew some inspiration and methodology from Martin Shelton’s “KeePass for Beginners” post, which you may also find useful. I’ll also note that KeePassXC has a quickstart guide on their site, as well as a wiki, and the Electronic Freedom Foundation has there own guide to KeePassXC. I’ll also note that KeePassXC is on Twitter.
How is KeePassXC Different from Other Password Managers?
KeePassXC is a bit different from other password managers like 1Password or LastPass in that it simply creates and manages an encrypted password database that lives on your computer like any other file. In other words, by default it is a local or “offline” password manager, while 1Password, LastPass, and their ilk can be thought of as “cloud-based” password managers.
There are some convenient methods to “sync” your KeePass password database with other devices (I go over some options below), but “out of the box” your passwords simply live on your computer in an encrypted file that you can only open with a master password.
Also note that, unlike 1Password and other options, KeePassXC is free (as in costs zero dollars), and its code is open-source. However, know that there is no company behind the product to offer formal support, as you might be used to with other products.
NOTE: Some screenshots and GIFs in this guide are from previous version of KeePassXC (only because I’m too lazy to remake them for the later versions. Please use the latest release version of KeePassXC.
Level 0: Starting Out
Downloading KeePassXC
First, let’s head over to the KeePassXC’s Download page.
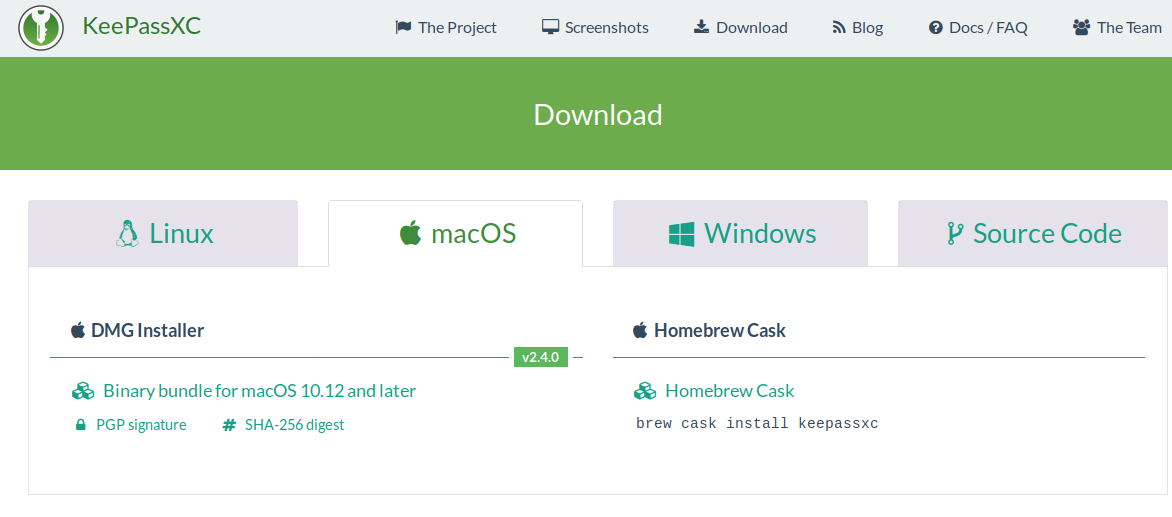
Select your desired operating system (the current options are Linux, macOS, and Windows), or to compile KeePassXC from source code. If we’re using macOS, we’ll go to the “macOS” tab and click the link labeled “Binary bundle for macOS 10.12 and later” to download the latest macOS release of KeePassXC to our computer.
Verifying our Download
Before you install KeePassXC from this downloaded file, it is recommended that you verify your download. By verifying the signatures of your KeePassXC download, you can prove the authenticity and integrity of the downloaded file. This guarantees that the file you just downloaded was originally created by the KeePassXC Team and that its contents haven’t been tampered with on the way to your hard drive.
If you’re comfortable using the command line, you can learn how to verify your download on the Verifying Signatures page of the KeePassXC website.
If you’re not comfortable pasting commands into Terminal, no worries. Scroll down to the Appendix at the bottom of this post for instructions of how to verify your KeePassXC download without using the command line.
Installing KeePassXC on macOS
Now that we’ve downloaded and verified our .dmg file, simply double click it to mount the disk image. Next drag the KeePassXC icon into you Applications folder.
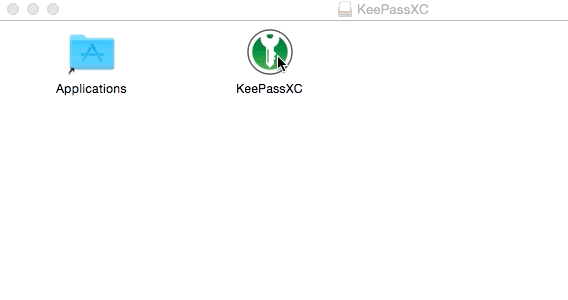
KeePassXC should now be installed on your computer.
A general overview of how KeePassXC works as a password manager
As we have learned, KeePassXC is a password manager– it saves your passwords (and associated usernames) securely for you. Before we go any further, lets talk a bit about how KeePassXC works.
We’re going to use KeePassXC, an application, to create and edit KeePass password databases. It may be helpful to think of it like Microsoft Excel: You use Excel to create and edit files on your computer. These files are spreadsheets. Similarly, KeePassXC enables us create and edit files on our computer that are databases of usernames and passwords.
Of course one significant difference between Excel and KeePassXC is that KeePassXC database files are always encrypted when not in use. To access them, you first open the database using KeePassXC (just as you would open a spreadsheet with Excel), at which point you must enter the “master key”, which is usually a long master password, in order to access the database.
So let’s create a KeePass database and see how we use it to save and manage passwords securely.
Level 1: Getting Setup
Now that KeePassXC is installed on our machine, let’s create a password database.
Creating a Password Database
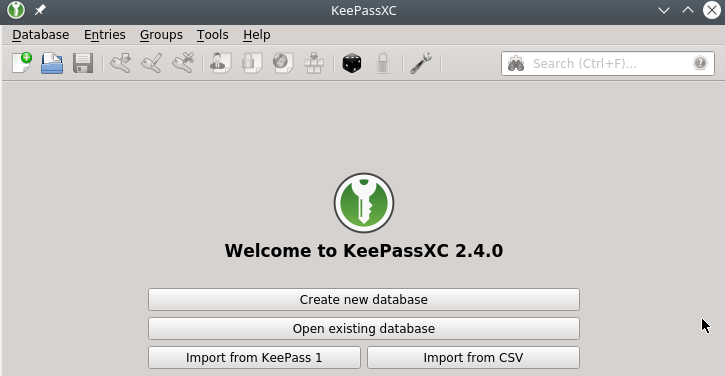
When we launch KeePassXC for the first time, we’re greeted with the screen above. Since we don’t have any databases yet, let’s click the “Create new database” button.
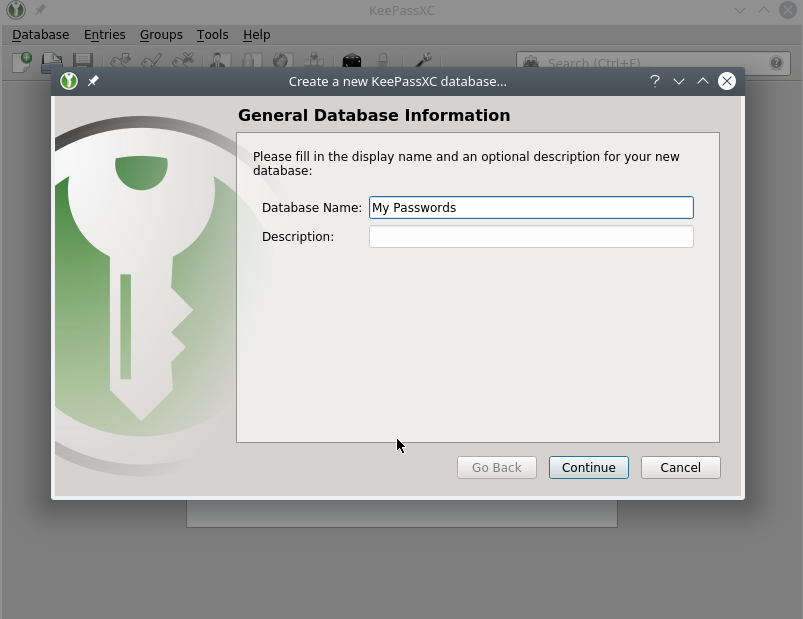
First, we’re asked to choose a name and, optionally, a description for our passwords database. I just called mine “My Passwords”.
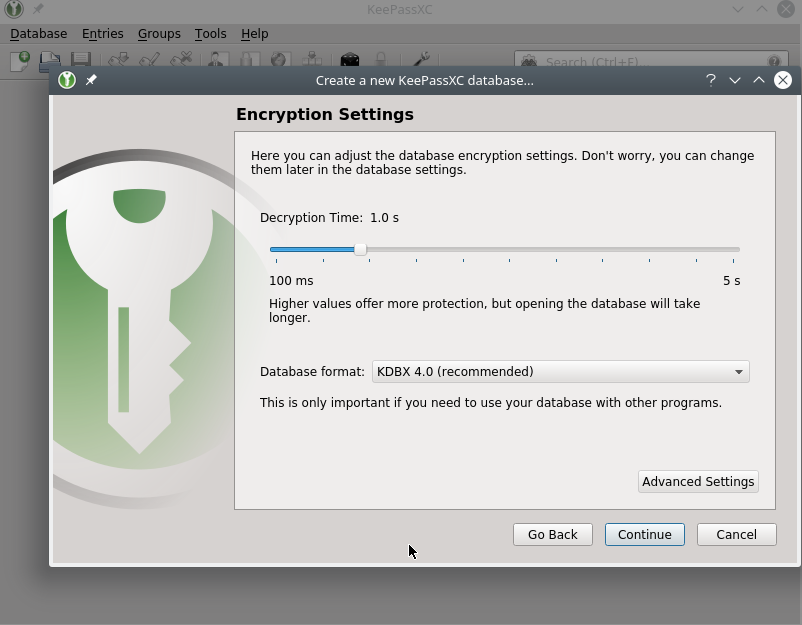
Next, we’re asked about some encryption settings. I highly recommend leaving the defaults settings as they are. Do not choose a decryption time under 1.0 seconds. I don’t recommend even going into “Advanced Settings” (at this point).
Next, we’re asked to set up a master key. In our case, for now, this will just be a password or passphrase.

Since this password is the key that opens the metaphorical door to all of our passwords, we want to make this password very hard to guess. For this reason I recommend using as passphrase of about six random words. Some examples “pushiness earthly snowsuit overcast agile unlinked” or “stadium bazooka pastime battery survey scorpion” (do not choose these exact ones because, lol, they’re on the internet now).
Thankfully, KeePassXC has a built-in tool to randomly generate passphrases for us. Just click the die icon on the right side of this screen, and the password generator will appear. Since we want to generate a passphrase, click the “Passphrase” tab.
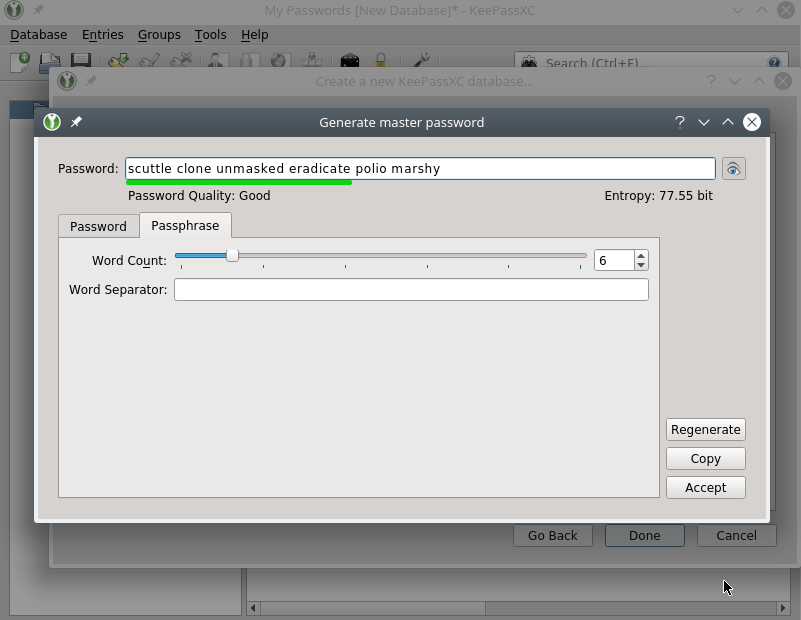
Once we have one we like, write this passphrase down on a piece of paper, and keep it somewhere safe. It’s very important not to lose this passphrase – KeePassXC does not have a reset mechanism for this.
Eventually you should memorize this phrase – it’s not as hard as it seems. For example, one trick is to create a little story about them in your head about them.
When you’ve got it written down somewhere safe, click Done.
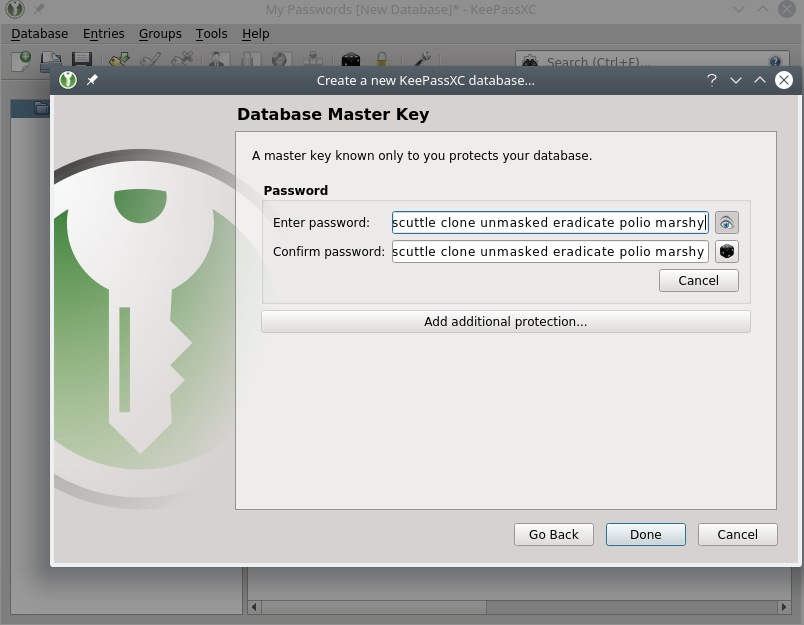
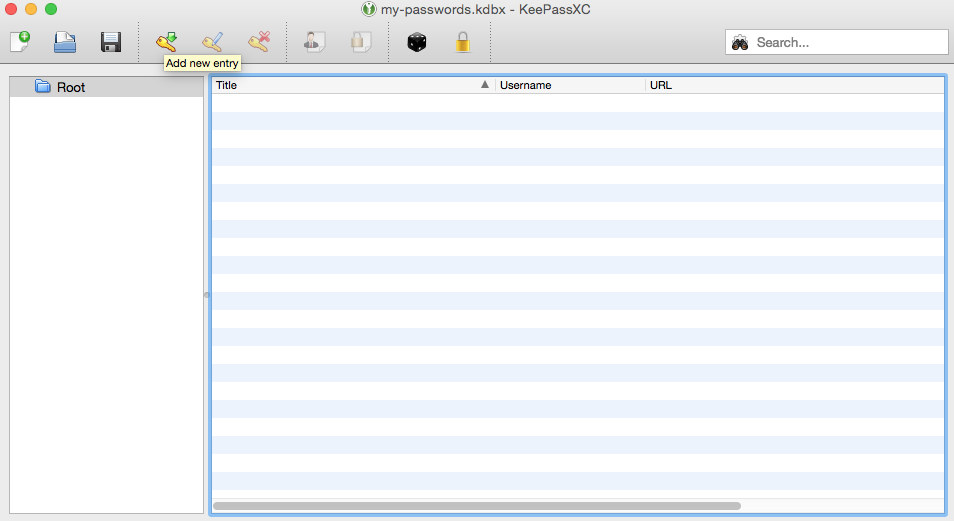
Congrats – You’ve made your first KeePass database.
Creating your first entry
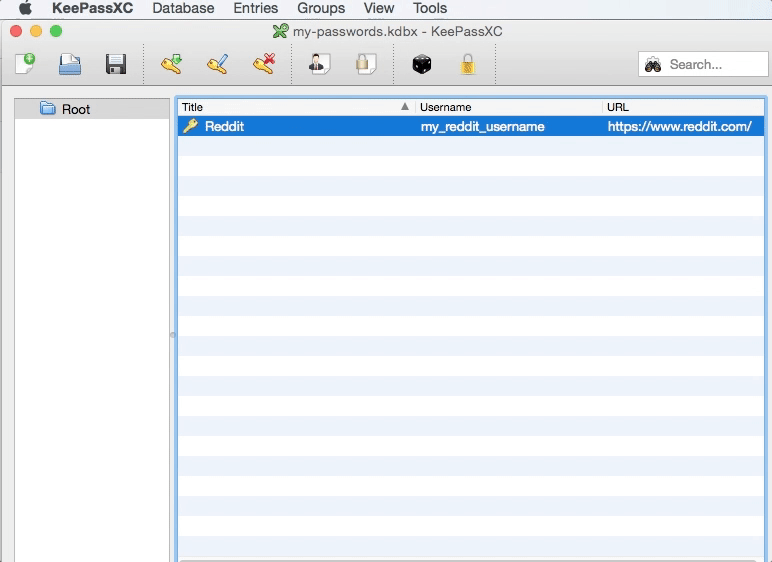
Let’s add our first entry. As an example, let’s say we want to store our Reddit username and password.
First, find the button with the key and the green downward arrow.
We’ll be presented with an interface to create our new entry. Let’s fill in a title (Reddit), Username (our Reddit username), our Reddit password twice, and then the URL of the site (https://www.reddit.com), which you can of course paste in.
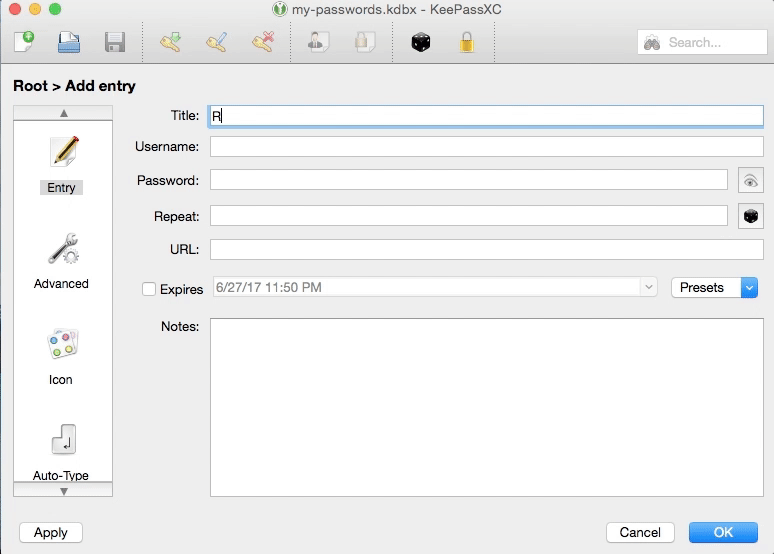
If you want to view your password, you can click the button with the eye icon on the right.
As mentioned, KeePassXC has the ability to generate random passwords for us, which we can do by clicking the black die icon. We’ll go over that below, but for now let’s pretend we’re simply storing your existing password that you hopefully know by heart (but won’t have to for much longer!).
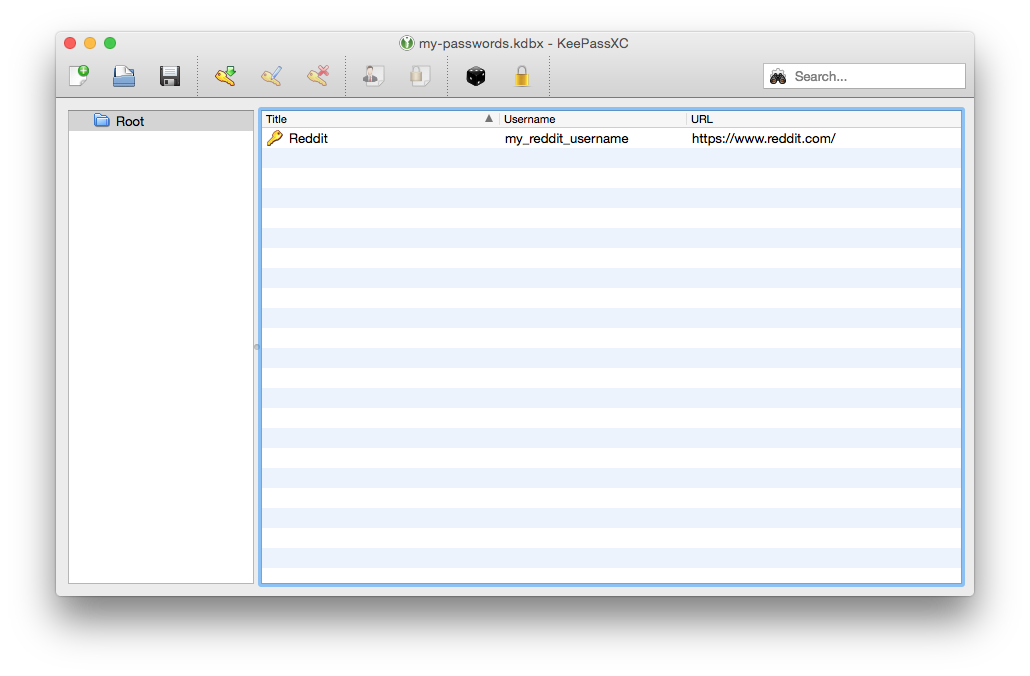
Once we’ve filled in this basic information, we’ll click the OK button to create this new entry in our password database. We’ll now see our new entry in our database.
Save your Database, and give it a file name
Now would be a great time to save our database for the first time. To do this, either click the button with floppy disk icon or go to Database > Save database. Choose a file name for your database, being sure to keep the .kdbx file extension. “my_passwords.kdbx” is a fine example. Then choose where you want to save your database.
Remember, your database file will be encrypted, so you don’t have to obfuscate the databases name or location. That said, there are obviously some security-vs.-convenience trade-offs to, say, keeping your database off of cloud services like Dropbox, or on USB sticks you keep safe.
Logging in to Reddit
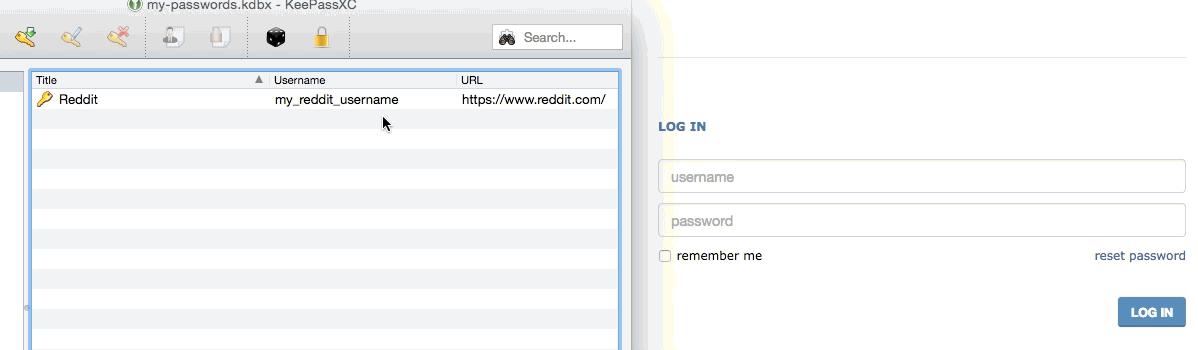
OK now let’s actually use KeePassXC to log in to Reddit. KeePassXC has a few ways to do this– we’ll start with the simplest.
Basic Copy and Paste
Let’s open https://reddit.com in a browser. With KeePassXC open to the side and our lone entry highlighted (single clicking it), click the person + paper icon to copy your Reddit username to the clipboard. Go paste that into the Reddit login page. Then return to KeePassXC to click the lock + paper icon to copy your Reddit password to your clipboard. Paste that into the Reddit login page, and click the “LOG IN” button (or press enter).
(In the GIFs below I actually log in from the page https://reddit.com/login. I did this to make the GIFs a little cleaner– these procedures should work in either form.)
There are keyboard shortcuts to make this process slightly quicker. For example, on macOS, Command + b will copy the highlighted entry’s username to your clipboard. Command + c will copy the entry’s password.
Auto-Type: A more convenient login workflow
KeePassXC has a feature called Auto-Type that, as the name implies, automatically types your username and password into a form.
Note: If you’re using MacOS Mojave, you’ll need to go to Mac Settings > Security & Privacy > Privacy > Accessibility and allow KeePassXC to control your computer in order to use Auto-Type. More information here.
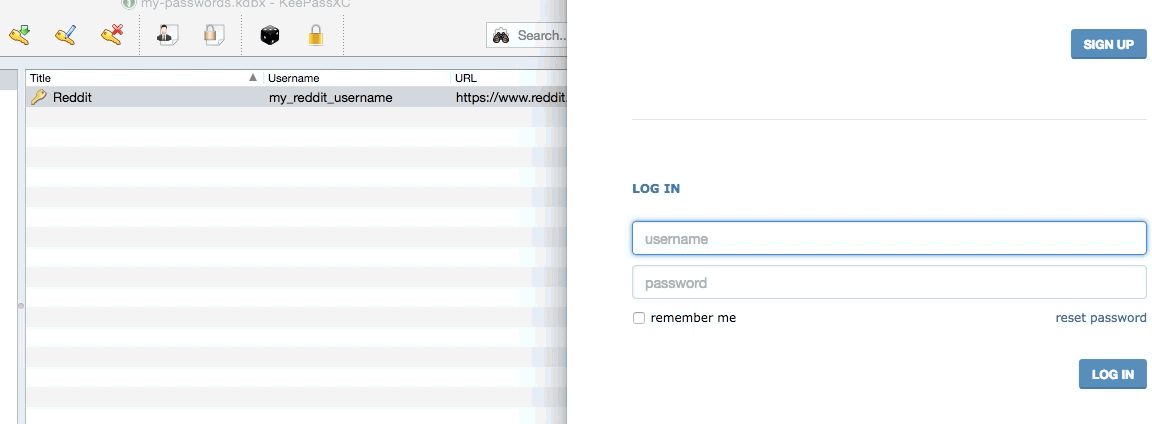
One way to use Auto-Type is the Auto-Type button in the toolbar. To perform an Auto-Type using this button, start with your cursor in the username field of the browser form you want to sign in to. Then, over in KeePassXC, single-click the entry you want to Auto-Type and then click the Auto-Type button. KeePassXC will type your username, hit tab, type your password, and then hit enter.
Alternatively you can right-click the entry you want to Auto-Type and select “Perform Auto-Type” (see slightly outdated GIF below).
(Note that the Auto-Type keyboard shortcut on macOS is Command + v.)
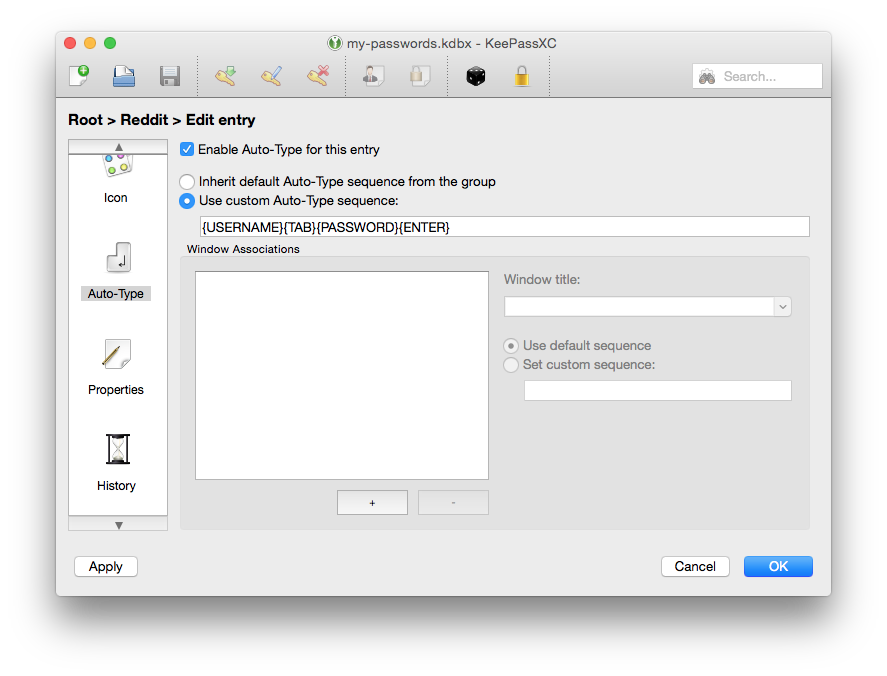
{USERNAME}{TAB}{PASSWORD}{ENTER} is the default Auto-Type sequence. However you can edit this sequence on a per-group or per-entry level.
To edit the Auto-Type sequence for a single entry, we’ll first choose to edit the entry– we can do this by clicking on the entry we want to edit and then clicking button with the key and blue pen icon. Next, we’ll look in the menu of large icons on the left side of the window and click on the Auto-Type section of the menu (you may have to scroll down a little). Finally, we’ll click the “Use custom Auto-Type sequence” radio button and write a custom Auto-Type sequence. (You can find more info on writing these custom sequences in the KeePassXC wiki and on the original KeePass’s website.)
BONUS Tip: If you use multiple “spaces” or multiple physical displays with macOS, you’ll want to allow KeePassXC to access all of your desktops. This will allow you to use Auto-Type even if KeePassXC and your browser window are on different monitors or desktops.
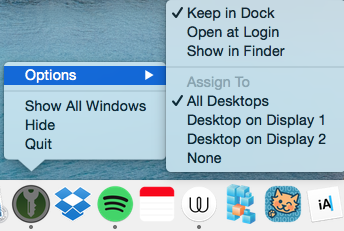
To enable this, right-click on the KeePassXC icon in your dock, go to Options, and click on “All Desktops”.
Global Auto-Type
KeePassXC also has a Global Auto-Type feature which allows us to create a global (i.e. operating-system wide) keyboard shortcut to Auto-Type information from a KeePassXC entry.
For this example, let’s say we want to set our Global Auto-Type shortcut to Control + Option + v. To do this, we’ll go to KeePassXC menu (in the way top left of your screen, next to the Apple icon), then click Preferences to get to the “Application Settings” menu. We’ll be taken to the “General” settings menu. Next, click the “Auto-Type” tab (located in the center of the window to the right of “Basic Settings”). Finally, left-click inside the text box to the right of the text that says “Global Auto-Type shortcut”. You may not see a cursor appear– that’s OK. Just hit your key combination– in our example that’s Control + Option + v.
If you do all that successfully you’ll be looking at a screen like the one below.
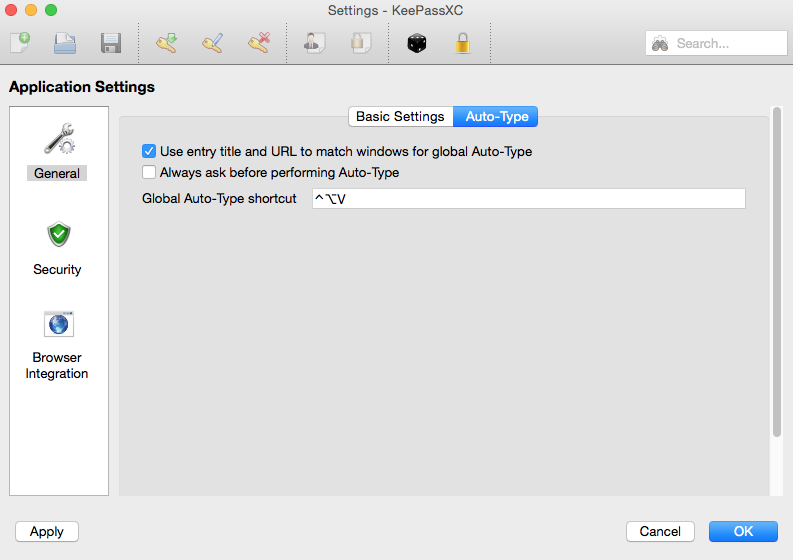
Hit the OK button in the bottom-right corner.
Awesome– now let’s use our Global Auto-Type shortcut.
Now that we’ve set this shortcut here’s the workflow to perform the Auto-Type:
With our KeePassXC database open and unlocked, place your cursor in the username field of a browser form. Then hit the Global Auto-Type shortcut (which, if you followed our example, is Control + Option + v). KeePassXC should then find the right entry based on its title and URL and fill it in for you.
Note: For Reddit in particular, I’ve found that using https://www.reddit.com/login, as opposed to https://reddit.com, works better for Global Auto-Type.
One nice advantage to the Global Auto-Type is that KeePass will find the relevant entry based on the entry title and URL, as opposed to having to find it ourselves as the normal AutoType workflow described above requires. If you have more than entry for a given service– say a Google/gmail account for work and another for personal use– KeePassXC will ask you which one you want it to Auto-Type.
Browser autofill with extensions
In addition to Auto-Type, KeePassXC offers another way to quickly and easily enter your login information into a browser form called KeePassXC-Browser. KeePassXC has browser extensions for both Firefox and Chrome – you can learn more about it in the KeePassXC official docs.
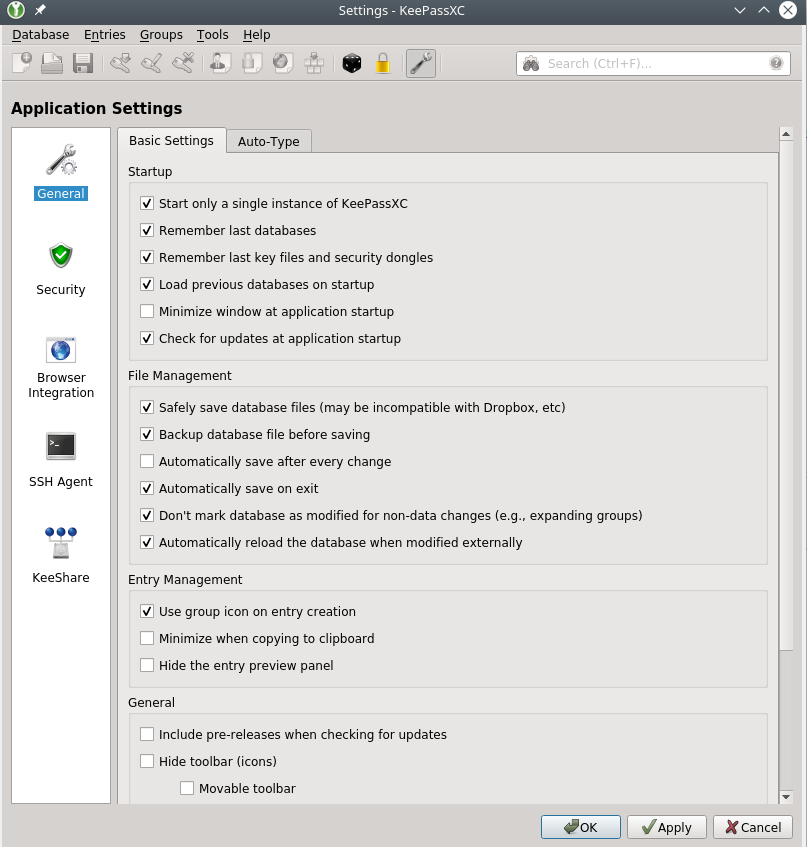
KeePassXC Settings
To access the KeePassXC settings menu on macOS, click the “KeePassXC” menu in the top-left of your screen and click Preferences.
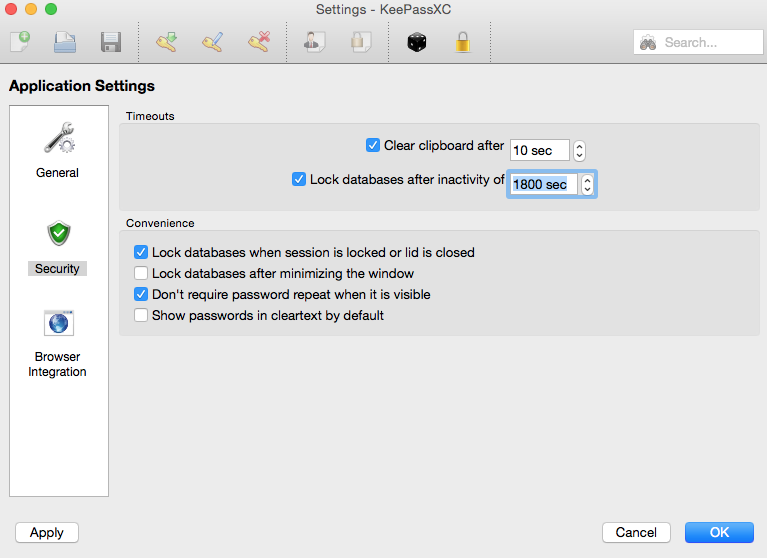
While the default settings are pretty good, I’d strongly recommend you confirm that two settings in particular are turned on. I’d recommend enabling “Safely save database files” (because of this bug – more info) and “Backup database file before saving”, which creates a copy of your database in the same directory as your database, but named <your-database-name>.old.kdbx. (While this feature may save you in a pinch, see the section below for more of my tips on backing up your database.)
Below are the settings I generally use (with KeePassXC version 2.4.0):
Locking your database
If you’re stepping away from your computer, it’s wise to lock your KeePass database. To do this, go to Tools > Lock database (or hit Command + l). Once locked, you’ll have to enter your master password to unlock your database.
Note that you can set KeePassXC to lock your databases after a specific number of seconds of inactivity by going to KeePassXC Preference > Security.
Migrating from another password manager to KeePassXC
If you’re moving to KeePassXC from another password manager, you’ll likely want to convert your collection of passwords into a KeePass database file, which has the file extension .kdbx.
The easiest way to do this is to export your previous database to a CSV file (stands for Comma Separated Values– this file will be unencrypted, so be careful with it), then, in KeePassXC, go to Database menu > Import > “Import from CSV file…” Once it’s all imported and your new KeePass database is all set and you save it, you’ll very likely want to delete the unencrypted CSV file.
Level 2: More Security Tips
We’ll now look at some further setting and practices that can make your usage of KeePassXC even more secure. I’ve tried to put the required basics in the sections above– this is the sort-of optional-but-good-to-do things.
Generating random passwords for your accounts
One of the best benefits of using a password manager like KeePassXC is that, since you only have to remember one master password and can forget your individual account passwords, you can use long unique, random passwords for each service you use. Martin Shelton, a user and security researcher, explained the benefits of random, unique passwords succinctly in a Medium post about password managers:
If you use the same password everywhere, a hacker only needs to get your password once in order to break into many of your online accounts… For example, Yahoo recently announced that passwords for 500 million Yahoo users were breached in 2014. Imagine if an attacker used your single, easy-to-remember password to access your health care records, your home address, credit card numbers, or your social security number… To minimize the damage from a breach, you should use unique passwords on each account. But it can be a challenge to remember each password.
KeePassXC has a built-in random password generator just for creating passwords you’ll likely never have to memorize.
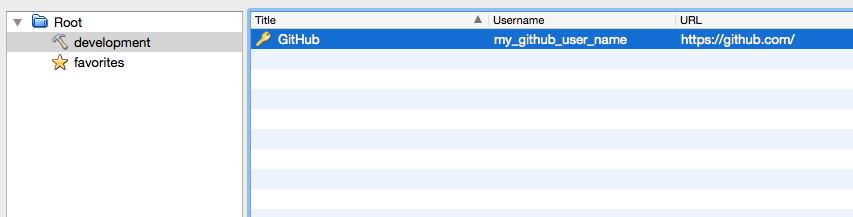
Let’s say we’re creating a new GitHub account and want to store our username and password in our KeePass database. First, we’ll create an entry for GitHub and create a random password for our yet-to-be-created GitHub account.
First, we’ll hit the button that looks like a key with a green down arrow to create a new entry. Then fill out the title and username as we did above. However now, instead of just typing in our existing password (or making one up), we’re going to use KeePassXC’s password generator to create a random password for our yet-to-be-created GitHub account.
The password generator has a few options. First, we can choose between a “Password” (a series of random characters) and a “Passphrase” (a series of random words). Passphrases have to be longer in length to be as secure as passwords, but they may be easier for you to remember and type in on a mobile device.
If we were creating a random password, we have a number of options. We can increase or decrease the length, choose to include or exclude uppercase letters, lowercase letters, numbers, or special characters. And we can even choose to “exclude look-alike characters” and whether to “Pick characters from every group”. Most of these options exist to help you, the user, get around password requirements like “must contain at least one number and one uppercase letter” or “cannot include any special characters”, etc.
If we’re creating a random passphrase, we can only select length and the word separator. For length, 6 or 7 is usually fine (watch the password strength meter). For the word separator, I personally prefer a hyphen, but that can be your call (you likely won’t ever have to type this passphrase in by hand anyway).
Once you’ve got a password or phrase you like and that meets the service’s requirements (in our case, GitHub), hit the Apply button to set your new password or passphrase. Then hit OK to store your entry. Click the floppy disk icon to save your database.
Now go to GitHub’s sign-up page and create a new account with the username and password we just saved in your database.
Changing your master password (hopefully to a long, random passphrase)
As we saw when we were creating our first KeePass database, we can also use KeePassXC’s built-in password generator to generate a random passphrase to be used as our master password. Since you actually have to type in this password, it makes more sense to use a passphrase than a password.
If, for whatever reason, you didn’t make your master password (or master key) a randomly generated passphrase, or you just want to change your master password, let’s go over how to do that.
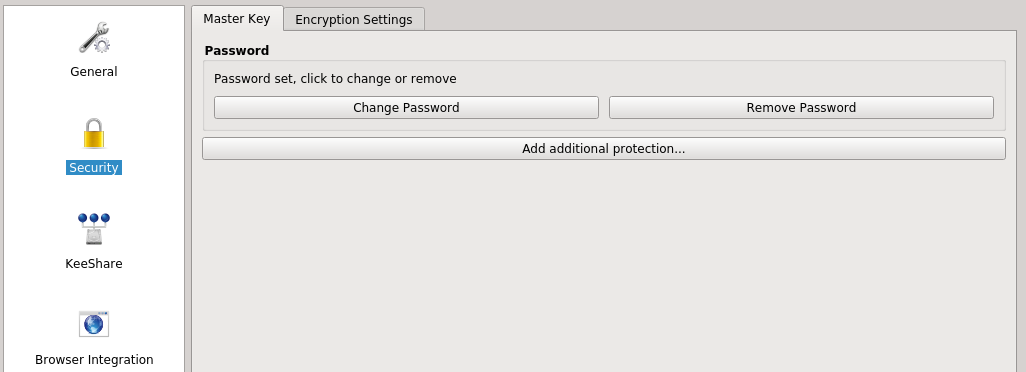
To change the master password of an existing KeePass database, go to the “Database” menu and hit the button that says “Change Password”.
Next click the black die icon to generate a new random passphrase. Once you’ve got a 6-or-more word passphrase with your desired word separator, write your new passphrase on a piece of paper and keep it somewhere safe.
NOTE: It’s very important to know that you’re going to need to remember this passphrase (as it’s not going to be stored in your KeePass database). Basically, don’t actually change your master password to the generated passphrase unless you have it written down somewhere or memorized.
One trick for remembering your new passphrase is to create a little story about them in your head about them.

Backing Up Your Database
Now we’ve got a nice and secure database with all of our important password in it, some of which you won’t possibly be able to remember without your database. But what if you lose your database file? To protect ourselves from this, we’re going to periodically create back-up copies of our database.
To do this, we’ll copy our database file (the file extension of which is .kdbx) somewhere safe as a back-up. This could be a USB drive, an external harddrive, a second computer, or even a cloud-based storage solution like DropBox. Remember: this database is well encrypted, so even if an attacker gets a hold of it, they’ll need to know your master password to get access to your information.
Note that unless you employ one of the syncing options listed below, you’ll have to manually keep this back-up copy of your database up-to-date. That means periodically replacing your back-up copy with a fresh copy of your database.
Level 3: Getting Organized
Syncing options
If you want keep you KeePass database synchronized across multiple devices, you’ll need to share your database between those devices. The easiest way to do that is to use a cloud storage service like Google Drive, Dropbox, or iCloud. You simply move your KeePass database (which, remember, is well-encrypted) into a folder on your Google Drive or Dropbox.
If you’re wary of your password database being stored on servers you don’t own, you can explore other options like Syncthing, a program that keeps a folder or multiple folders “in-sync” across multiple computers that you own (think Dropbox but without the Dropbox server involved.) However note that Syncthing involves a bit more set up (I wrote a getting started guide to Syncthing a few weeks ago if you want a quick preview of what you’d be getting into).
To access your passwords from a smartphone, you’ll need to use an app that can open KeePass databases. There are a handful of such apps for both iOS and Android, but I haven’t used any of them so I won’t comment further. However I will note that, when I asked the KeePassXC developers who run their Twitter account what the recommended, they said Keepass2Android for Android and Strongbox for iOS. Others recommend KeePassDX for Android users.
Troubleshooting Syncing
Note that KeePassXC 2.3.0 added a new setting called “Safely save database files”. If you’re having trouble syncing your database you may want to try disabling this feature. You can read more about this issue and setting here.
Using Groups
As you’ve likely noticed, on the left-hand side of KeePassXC there’s a folder tree. Using these folders, you can keep your accounts organized in groups like “work”, “finance” and whatever other categories you like.
You can later drag entries in and out of groups. You can even create groups within groups.
Downloading Favicons
To beautify your KeePass database even further, you can automatically download the favicon (usually the service’s logo) from the website of the service.
To do this, edit an entry, then click the “icon” button on the left. While you can select from any of the default options, you can also click the “Download favicon” button in the bottom right. Be sure to have the full URL of the service in your entry (in this case https://github.com/), so KeePassXC knows where to download the favicon from.
![]()
Once the favicon downloads (it might take a second), be sure to select it and then hit “OK” to save the changes to the entry.
Search
KeePassXC, as you may have already observed by this point, has search functionality via a text field in the top right of the program. As of KeePassXC v 2.2.0 it searches all of your folders, regardless of which folder you’re currently in, which is nice.
On a Mac it can be invoked by the familiar Command + f keyboard shortcut.
As of version 2.4.0, KeePassXC has an advanced search feature. You can learn more about it by clicking the question mark in the search bar.
Storing TOTP codes in your KeePass database
If you have two-factor authentication enabled on some of your accounts (which I whole heartedly recommend!), you may be using an app like Google Authenticator on your phone to display 6-digit codes that act as your second-factor. These are time-based one-time passcodes (TOTP).
KeePassXC can store and handle these TOTP codes for you. Note that this is a security trade-off: if you store your regular password and your TOTP code in the same KeePass database, anyone who gets into that database will have both of your authentication factors… so it’s kind of like it’s down to one-factor authentication. As 1Password noted in a blog post when they introduced a similar feature:
If you would like to turn a site’s offering of TOTP into true two-factor security, you should not store your TOTP secret in 1Password (or in anything that will synchronize across systems). Furthermore, you should not use the regular password for the site on the same device that holds your TOTP secret… Put simply: the device that holds your TOTP secret should never hold your password if your aim is genuine two factor security.
So all that said here’s how to do this in KeePassXC. Let’s say I want to store my TOTP code for my Slack account in my KeePass database. First, if you haven’t yet, make a new entry for Slack in your database, just like we did with our Reddit account above. Enter the password if you like.
When you turn on two-factor authentication in a service like Slack, you’d select TOTP as your desired second factor (as opposed to SMS). Usually you’re then presented with a QR code to point your phone at. Unfortunately, as far as I know, KeePassXC requires an alphanumeric “key” instead of a QR code. (There are ways of getting this key from a QR code, but the only sure way I know involves using the command line and a tool called zbar – I wrote about that here.)
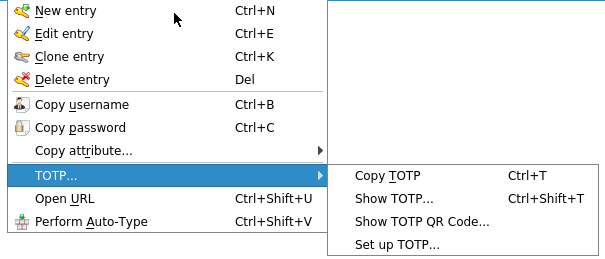
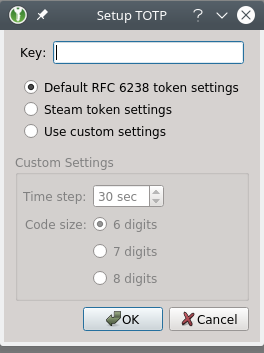
Once you have the key, go back to KeePassXC and right-click your Slack entry, hover over the “TOTP…” option, and click “Set up TOTP…”
Enter your key into the presented form, and specify custom settings if needed (I have found the default settings are usually right).
Once your TOTP code is set up, KeePassXC allows you to do a number of useful things: copy the TOTP code, show the code, and even show the TOTP QR code. Since KeePassXC can show the QR code, it makes KeePassXC a good choice for a place to back-up these TOTP codes. Then, if you lose your phone, you can quickly and easily generate QR Codes to enter into a new phone’s authenticator app.
Level 4: Securing our database with multiple factors
As we’ve learned, KeePassXC lets us lock our database behind a master password. However we can also require those who wish to open our database to have other factors as well.
Key File
The simpler example of a second factor is a key file. A key file is a file that needs to be present for the database to be opened. It’s not your database file– it’s usually just a text file with a bunch of random characters.
On its face, this may seem not very useful. If an attacker has access to your database file, they likely have access to other files on your computer. However things get more interesting if, for example, you have your database on your computer’s hard drive but you have your key file on a USB flash drive. With this setup, you’ll need to enter your master password AND have the USB stick plugged into the computer to open your database.
A second example of where a key file could potentially give you more security is: if you store your database file on a cloud service (DropBox, Google Drive, etc.) to more easily keep it in sync between devices, you could create a key file that is never shared on the cloud service (you’d move it around via USB stick or something similar). Since the key file never changes, you don’t have to keep in sync– just get it on each device at setup time and you’re done.
Using a Key File
To assign a key file to an existing KeePass database, go to the “Database” menu and select “Change master key”. First, enter your master password twice (if you want to change it you can at this juncture, or just enter your old one).
Now check the check box labeled “Key file” and then either select an existing file to be your key file, or have KeePassXC create a key file for you. For a variety of reasons I’d recommend that you have KeePassXC create a key file for you.
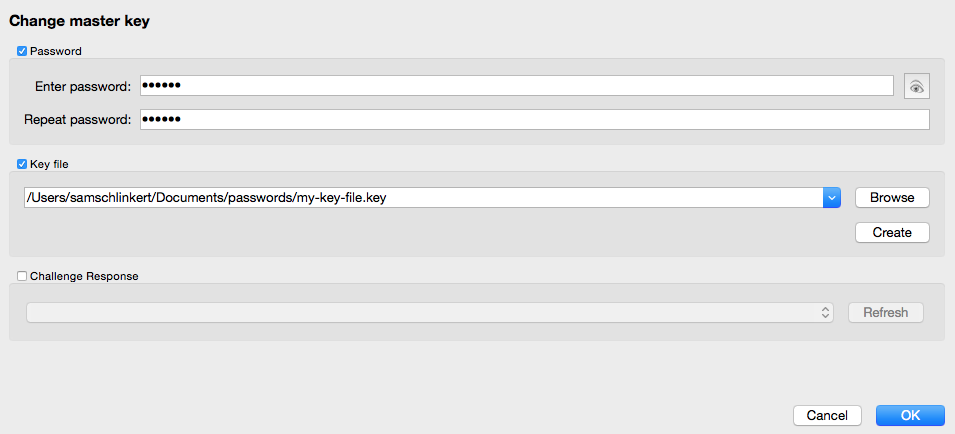
Click the OK button for these changes to take effect. Once you have, KeePassXC will require access to that key file to unlock your database.
Challenge Response
KeePassXC version 2.2.0 offers support for using a “token”, like a YubiKey, to unlock your database (also described as “YubiKey challenge-response support”). A YubiKey is a “smart key” that plugs into a USB port on your computer and helps you verify your identity. This is that third option for a KeePassXC master key, labeled “Challenge Response”.
This feature is relatively new to KeePassXC, and does not yet exist in KeePassX. For these reasons I’m not going to go over how to use it at this time. However if you’re feeling adventurous, I’d start with this section of the official KeePassXC FAQ.
Appendix A: Verifying Your KeePassXC Download Without Using The Command Line
You should follow these steps after downloading the KeePassXC dmg file, but before you install it. KeePassXC’s official site now has pretty good instructions too.
1. Download GPG Suite
Let’s head over to gpgtools.org. At the time of this writing, there’s a beta version of this software called “GPG Suite 2017.1” and a regular version of “GPG Suite”. If you’re running macOS Sierra (10.12) or higher, I’d advise you go with the beta version. If you’re running an older version of macOS (10.11 or earlier), you should be good with the not beta version.
After downloading the proper version of GPG Suite, install it as you would any other Mac application. The GPG Suite website provides a guide to verifying your GPG Suite download, as well as any downloaded file.
2. Download and Import the KeePassXC GPG Public Master Key
Once GPG Suite is installed, go to the KeePassXC page on verifying downloads.
We’re looking to download and import KeePassXC’s public master key, which should be below the heading “Importing the Public Master Key”. One way to do this is to find the link in the sentence “Manual download from our website and import with gpg”. Right-click (or control + click on Mac) the link and select “Save Link As…” and save it to your Downloads folder.
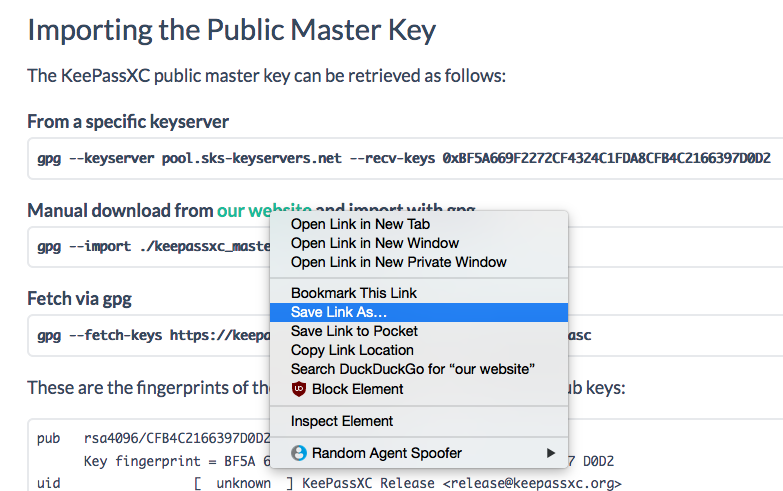
Now open a program called “GPG Keychain” (it should be part of the GPG Suite we installed earlier). In the top-left, click the “Import” button and select the master public key file you just downloaded.
If you successfully imported the key, you should get a message to that effect.
3. Crosscheck the Public Master Key You Downloaded
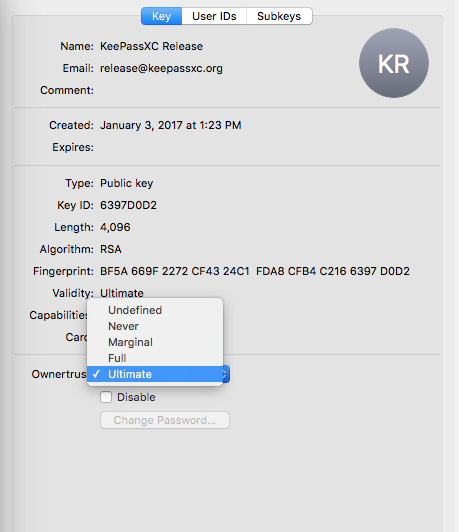
Now, if the KeePassXC website is compromised, this public key could be compromised as well. To mitigate this risk, we’re going to crosscheck the key you downloaded with other sources. Another one of these sources is KeePassXC’s Twitter account: the developers should have a pinned tweet that contains what’s called a “fingerprint” of their master key, or at least the last 16 characters of the fingerprint.
In GPG Tools, double-click the “KeePassXC Release” key. In the sidebar that pops up, look for the fingerprint of the key you downloaded – it should be 40 characters spaced out in 4-character segments. The last 16 characters of it should match the 16 characters in the pinned tweet exactly.
Another source is the Github repository of the KeePassXC website. The key fingerprint should be displayed somewhere around line 86 of this page.
Once you’re satisfied that you downloaded and imported the actual key, change the “Ownertrust” setting to “Ultimate”, via the dropdown menu.
4. Download the GPG signature of your KeePassXC Release
Now, let’s head back over to the KeePassXC download page. Click the “macOS” tab if it’s not already highlighted and then click the link called “GPG signature”. Save this file to your Downloads file, where you downloaded the KeePassXC dmg file earlier. It’s important that they’re in the same folder (this folder is likely the Downloads folder).

5. Verifying your Download
Now, right-click the .dmg file and go to Services > “OpenPGP: Validate”. You should get a pop up that says “Signed by: KeePassXC Release release@keepassxc.org” and then a “key ID” in parentheses. For us, what’s critical is that you see “ultimate trust” printed at the end of the line. If you do, you’re good!

Congratulations! Now you can install KeePassXC more confident that your downloaded file has not been tampered with!
Again, if you spot any errors or have any suggestions for this post, feel free to contact me via Twitter or elsewhere.
Appendix B: Advanced: Setting the number of transform rounds yourself
This section attempts to give an explanation of the encryption settings we chose when creating our first KeePass database.
As of KeePassXC version 2.4.0, the default, basic encryption settings create a database that takes one second for their machine to decrypt. We want this process to take more than a few milliseconds, because it’s also the speed that an attacker would have to spend on each guess of our master password (assuming they were using a computer similar to ours).
If you accepted the default settings, you’re fine. If you want to learn a little more about transform rounds, read on.
The basic idea here is that we want to create a time delay for every master password guess. If we can slow down the process such that it takes roughly one second per guess, we’ll be able to hamper a brute force dictionary attack, in which an attacker would systematically guess every possible password.
The way KeePassXC allows for us to create this time delay is to change the way your database is encrypted such that any computer attempting to unlock it will be forced to run your master key through a high number of “rounds” of encryption before actually trying the password they want to try. You can read more about it in this blog post.
How many rounds should you set? Conveniently, KeePassXC has a “Benchmark” button that tests your current machine to see how many transform rounds it can do in 1 second. It then enters that number in the “Transform rounds” field for you.
To set the number of transform rounds to this one-second benchmark, with your database unlocked go to the Database menu and select “Database settings”. Then click the “Security” icon from the menu on the left, click the “Encryption Settings” tab, and finally click check the “Advanced Settings” options in the bottom-left.
To benchmark your system for 1 second, click the “Benchmark 1-second delay” button, wait one second for the higher number to appear in the form, and hit OK.
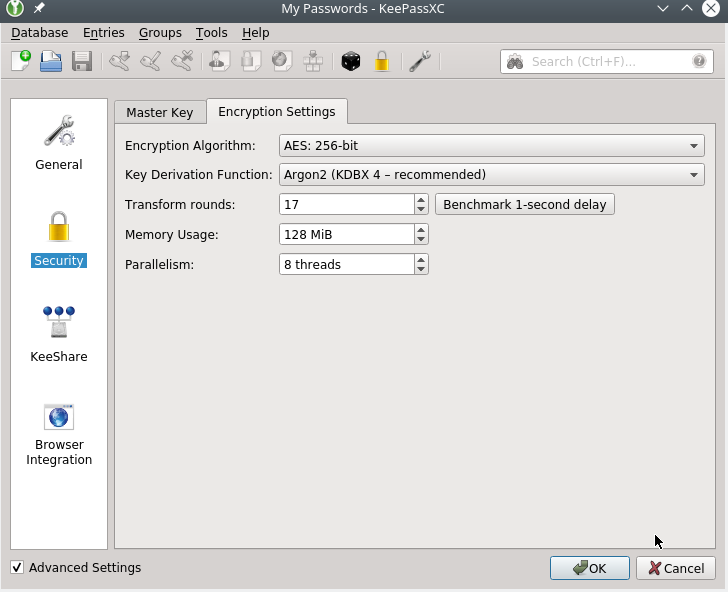
In the above screenshot, my computer did 17 transform rounds in 1 second, so that is my recommended number of rounds to encrypt my database with. I can click OK to accept that.
Now your database should take about one second to try a master password guess (whether it’s correct or incorrect). Assuming you, knowing the passphrase, can get it in one or maybe a handful of guesses, this is not much of a delay. But to a program systematically guessing millions of passwords, it can be a road block.