I was visiting family this past weekend and saw an iMac from 2007 and MacBook from 2008 destined for the trash. As the tech nerd of the family, I was asked if these machines were still useful at all. I also had a 2012 Macbook Air no one was using, so I figured I’d look into that one while I was at it.
The computers
- iMac5,1 from 2007. 1 GB of RAM.
- MacBook5,1 from 2008. 2 GB of RAM.
- MacBook Air5,2 from 2012. 8 GM of RAM.
As you might expect, none of these machines can run a version of mac OS that is currently supported by Apple:
- iMac5,1s can only be upgraded to 10.7.5 Lion (source), which stopped being supported by Apple years ago. It has 1 GB of RAM (I think these are roughly the correct specs).
- The latest OS a MacBook5,1 can handle is apparently OS X 10.11 El Capitan, which is also no longer supported. It has 2 GB of RAM. (Here are what I think are some accurate specs.)
- I think the 2012 Air can handle High Sierra, but even that is not currently supported.
(Note that I was not interested in making hardware upgrades to any of these machines, though that may be a good option for you!)
A note on securely erasing old data
For a variety of reasons, including my own laziness, I didn’t worry too much about securely erasing the existing data on these particular computers. That was probably a mistake. I think the older two machines have rotating drives (HDDs), which are easier to erase securely than the more modern solid state drive found on the 2012 Air. I don’t have enough confidence to point you to a resource, other than maybe ShredOS (which I kind of want to use just for the experience) and this this Wirecutter guide on scrubbing solid state drives.
If I do end up either donating or trashing them, I may take steps to more securely erase everything on them, hopefully effectively securely deleting everything that’s ever been on them.
A lightweight Linux distro?
I was most worried/focused on the 2007 iMac and the 2008 MacBook – given their age, I found them more interesting restoration projects, you could say. With no support from Apple for any of these computers, I looked to Linux. Given that the iMac has only 1 GB of RAM and the Macbook has 2 GB, I knew I needed a lightweight Linux distribution (aka “distro”).
In a past situations like this I have used Lubuntu and Puppy Linux, but figured I should look for something new to me and maybe more challenging. (Besides, Lubuntu felt a little too heavy for 1 GB of RAM, and I’m not sure if Puppy installs well with UEFI.)
The iMac
I started with the iMac5,1 (from 2007, 1 GB of RAM).
Step 1: I needed to find out if it has a 64-bit processor or a 32-bit one, something I’d need to know in order to pick a suitable distro and version of Linux.
It turns out that iMac5,1s have a 64-bit processor, BUT “it has a 32-bit EFI and is not capable of booting into 64-bit mode.”, which sounds like a real nightmare for someone facing the either/or choice of trying to install a 64- or 32-bit version of Linux. (In hindsight I would have been safe just to go with a 32-bit version.)
I decided to try a 64-bit iso first, figuring that it was preferable for finding software to install down the road.
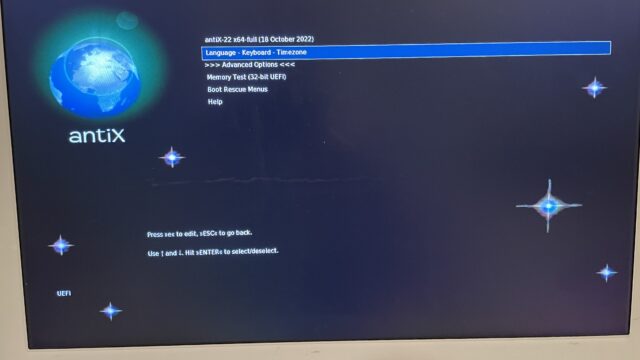
antiX Linux
After a bit of research, I found antiX Linux, which is based on Debian (awesome), and recently published a new release called, logically, antiX-22 based on Debian bullseye.
I downloaded the 64-bit “full” antiX Linux iso file from Sourceforge and flashed it onto a USB stick using Pop_OS’s “USB Flasher” program (you can use Etcher or something similar). My first goal was to try a live demo version of antiX to see how well it worked before installing it on to the computer hard drive.
Getting antiX to boot from USB stick
With the USB stick and a keyboard plugged in, I turned on the iMac, pressing and holding down the Alt/Option key when I heard the familiar Apple start-up sound. I then clicked on the “EFI” boot option.
I was greeted by the antiX boot screen loaded just fine. So far so good.
But when I chose to launch antiX I was taken to a black (but lit) screen.
I had had some experience with this when getting Ubuntu on to a 2009 MacBook Pro 5 years ago. I figured I needed to edit some GRUB settings.
I rebooted and held option/alt again to get back to the antiX boot menu. At this point, I hit ‘e’ instead of enter in order to edit the GRUB parameters. To learn more about the cause of the black screen, I tried a few options I knew that might give me more information, like adding nosplash, debug, and removing quiet. Thanks to these changes, I found out that the boot was hanging while the text “Waiting for /dev to be fully populated” was displayed.
Partial success? False hope?
After looking up other boot parameter options and a lot of trial and error, I added the nosplash failsafe disable=lxF parameters and antiX’s GUI live demo booted. Success! However, I think the failsafe options tells antiX not to use the computer’s video card, which negatively affects performance. But at this point I’m not sure of another way to make the GUI launch….
(I think what I ultimately need to do is to get the computer to use the correct AMD/Radeon driver – it has a AMD RV530/M56-P [Mobility Radeon X1600] graphic card–, but as of this writing I’m not sure how to do that.)
Excited, I went to actually install antiX to this hard drive. After some fooling around with the partition sizing, I got antiX to install on the hard drive successfully. But every time I’d reboot the computer (now with the USB stick unplugged) I would always get thrown into a CLI (no GUI desktop). This happened seemingly no matter what GRUB parameters or kernel version I tried. Frustrating that I could get the live USB to work, but not the installed-on-harddrive antiX to work…
MX+Fluxbox to the rescue
Then I remembered something: In my search for a suitable distro, I had tried MX Linux, “a cooperative venture between the antiX and MX Linux communities” with its default Xfce desktop.
The live USB booted once I added nomodeset to the GRUB options. But once the GUI booted, I realized why MX Linux is branded as a “middle-weight” distro: running the Xfce desktop, it was indeed sluggish with just 1 GB of RAM. So at that point I switched to trying to install antiX, hopeful that it would work as smoothly as MX, but with less weight. As I learned, for whatever (video-related?) reasons, antiX just wasn’t easily installing on this machine.
But! Later I learned that MX officially supports a Fluxbox desktop option, which is lighter than Xfce. With fingers crossed, I tried installing the 32-bit version and, once I added nomodeset nosplash to the GRUB options (by hitting ‘e’), it worked pretty well on the machine. Not exactly speedy, but usable. Given the age of this machine and other issues I had trying to install any Linux distro on it, I figure it was worth trying to install a distro that I knew was at least functional.
When I went to install, I did have some drive formatting issues pop up (“Could not format /root” or something similar.) I used GParted to re-partition the drive to one big ext4 partition. Once that was done, I re-launched the MX installer and chose the simple partition option, making the entire hard drive /root. (I don’t remember if the installer gave me the choice of where to install GRUB, but if it did I almost certainly chose MBR.)
I then waited for the install to complete, then the system rebooted and I was good to go (and remove the live USB)!
I am still curious why MX worked where antiX did not. Maybe a kernel version difference?
Here’s some inxi output from the installed MX+Fluxbox for the record:
System:    Kernel: 5.10.0-20-686-pae [5.10.158-2] i686 bits: 32 compiler: gcc v: 10.2.1
parameters: BOOT_IMAGE=/boot/vmlinuz-5.10.0-20-686-pae
root=UUID=<filter> ro nomodeset quiet splash
Desktop: Fluxbox 1.3.7 info: tint2 vt: 7 dm: LightDM 1.26.0
Distro: MX-21.2.1_fluxbox_386 Wildflower September 18  2022
base: Debian GNU/Linux 11 (bullseye)
Machine:   Type: Desktop System: Apple product: iMac5,1 v: 1.0 serial: <filter> Chassis: type: 13
v: Mac-F4228EC8 serial: <filter>
Mobo: Apple model: Mac-F4228EC8 v: DVT serial: <filter> UEFI: Apple
v: IM51.88Z.0090.B09.0706270921 date: 06/27/07
Battery:   Device-1: hidpp_battery_0 model: Logitech Wireless Gaming Mouse serial: <filter>
charge: 55% (should be ignored) rechargeable: yes status: Discharging
CPU:       Info: Dual Core model: Intel Core2 T7400 bits: 64 type: MCP arch: Core Merom family: 6
model-id: F (15) stepping: 6 microcode: D1 cache: L2: 4 MiB
flags: lm nx pae sse sse2 sse3 ssse3 vmx bogomips: 8655
Speed: 999 MHz min/max: 1000/2167 MHz Core speeds (MHz): 1: 999 2: 999
Vulnerabilities: Type: itlb_multihit status: KVM: VMX disabled
Type: l1tf mitigation: PTE Inversion; VMX: EPT disabled
Type: mds status: Vulnerable: Clear CPU buffers attempted, no microcode; SMT disabled
Type: meltdown mitigation: PTI
Type: mmio_stale_data status: Unknown: No mitigations
Type: retbleed status: Not affected
Type: spec_store_bypass status: Vulnerable
Type: spectre_v1 mitigation: usercopy/swapgs barriers and __user pointer sanitization
Type: spectre_v2
mitigation: Retpolines, STIBP: disabled, RSB filling, PBRSB-eIBRS: Not affected
Type: srbds status: Not affected
Type: tsx_async_abort status: Not affected
Graphics:  Device-1: AMD RV530/M56-P [Mobility Radeon X1600] vendor: Apple MacBook Pro driver: N/A
alternate: radeon bus-ID: 01:00.0 chip-ID: 1002:71c5 class-ID: 0300
Display: x11 server: X.Org 1.20.11 driver: loaded: ati,vesa
unloaded: fbdev,modesetting,radeon display-ID: :0.0 screens: 1
Screen-1: 0 s-res: 1680x1050 s-dpi: 96 s-size: 445x278mm (17.5x10.9")
s-diag: 525mm (20.7")
Monitor-1: default res: 1680x1050 hz: 77
OpenGL: renderer: llvmpipe (LLVM 11.0.1 128 bits) v: 4.5 Mesa 20.3.5 compat-v: 3.1
direct render: Yes
Comparing MX+Fluxbox vs. antiX
One interesting question this brings up is how MX+Fluxbox compares with antiX (using its defeault IceWM desktop), especially with regard to resource usage. My gut is that Fluxbox isn’t as light as IceWM, so a better comparison might be with both MX and antiX running Fluxbox, something I haven’t had a chance to do.
Regardless, if even to say I’ve done it, I wanted to get antiX running on some hardware. This is the attitude with which I turned to the MacBook5,1.
The MacBook
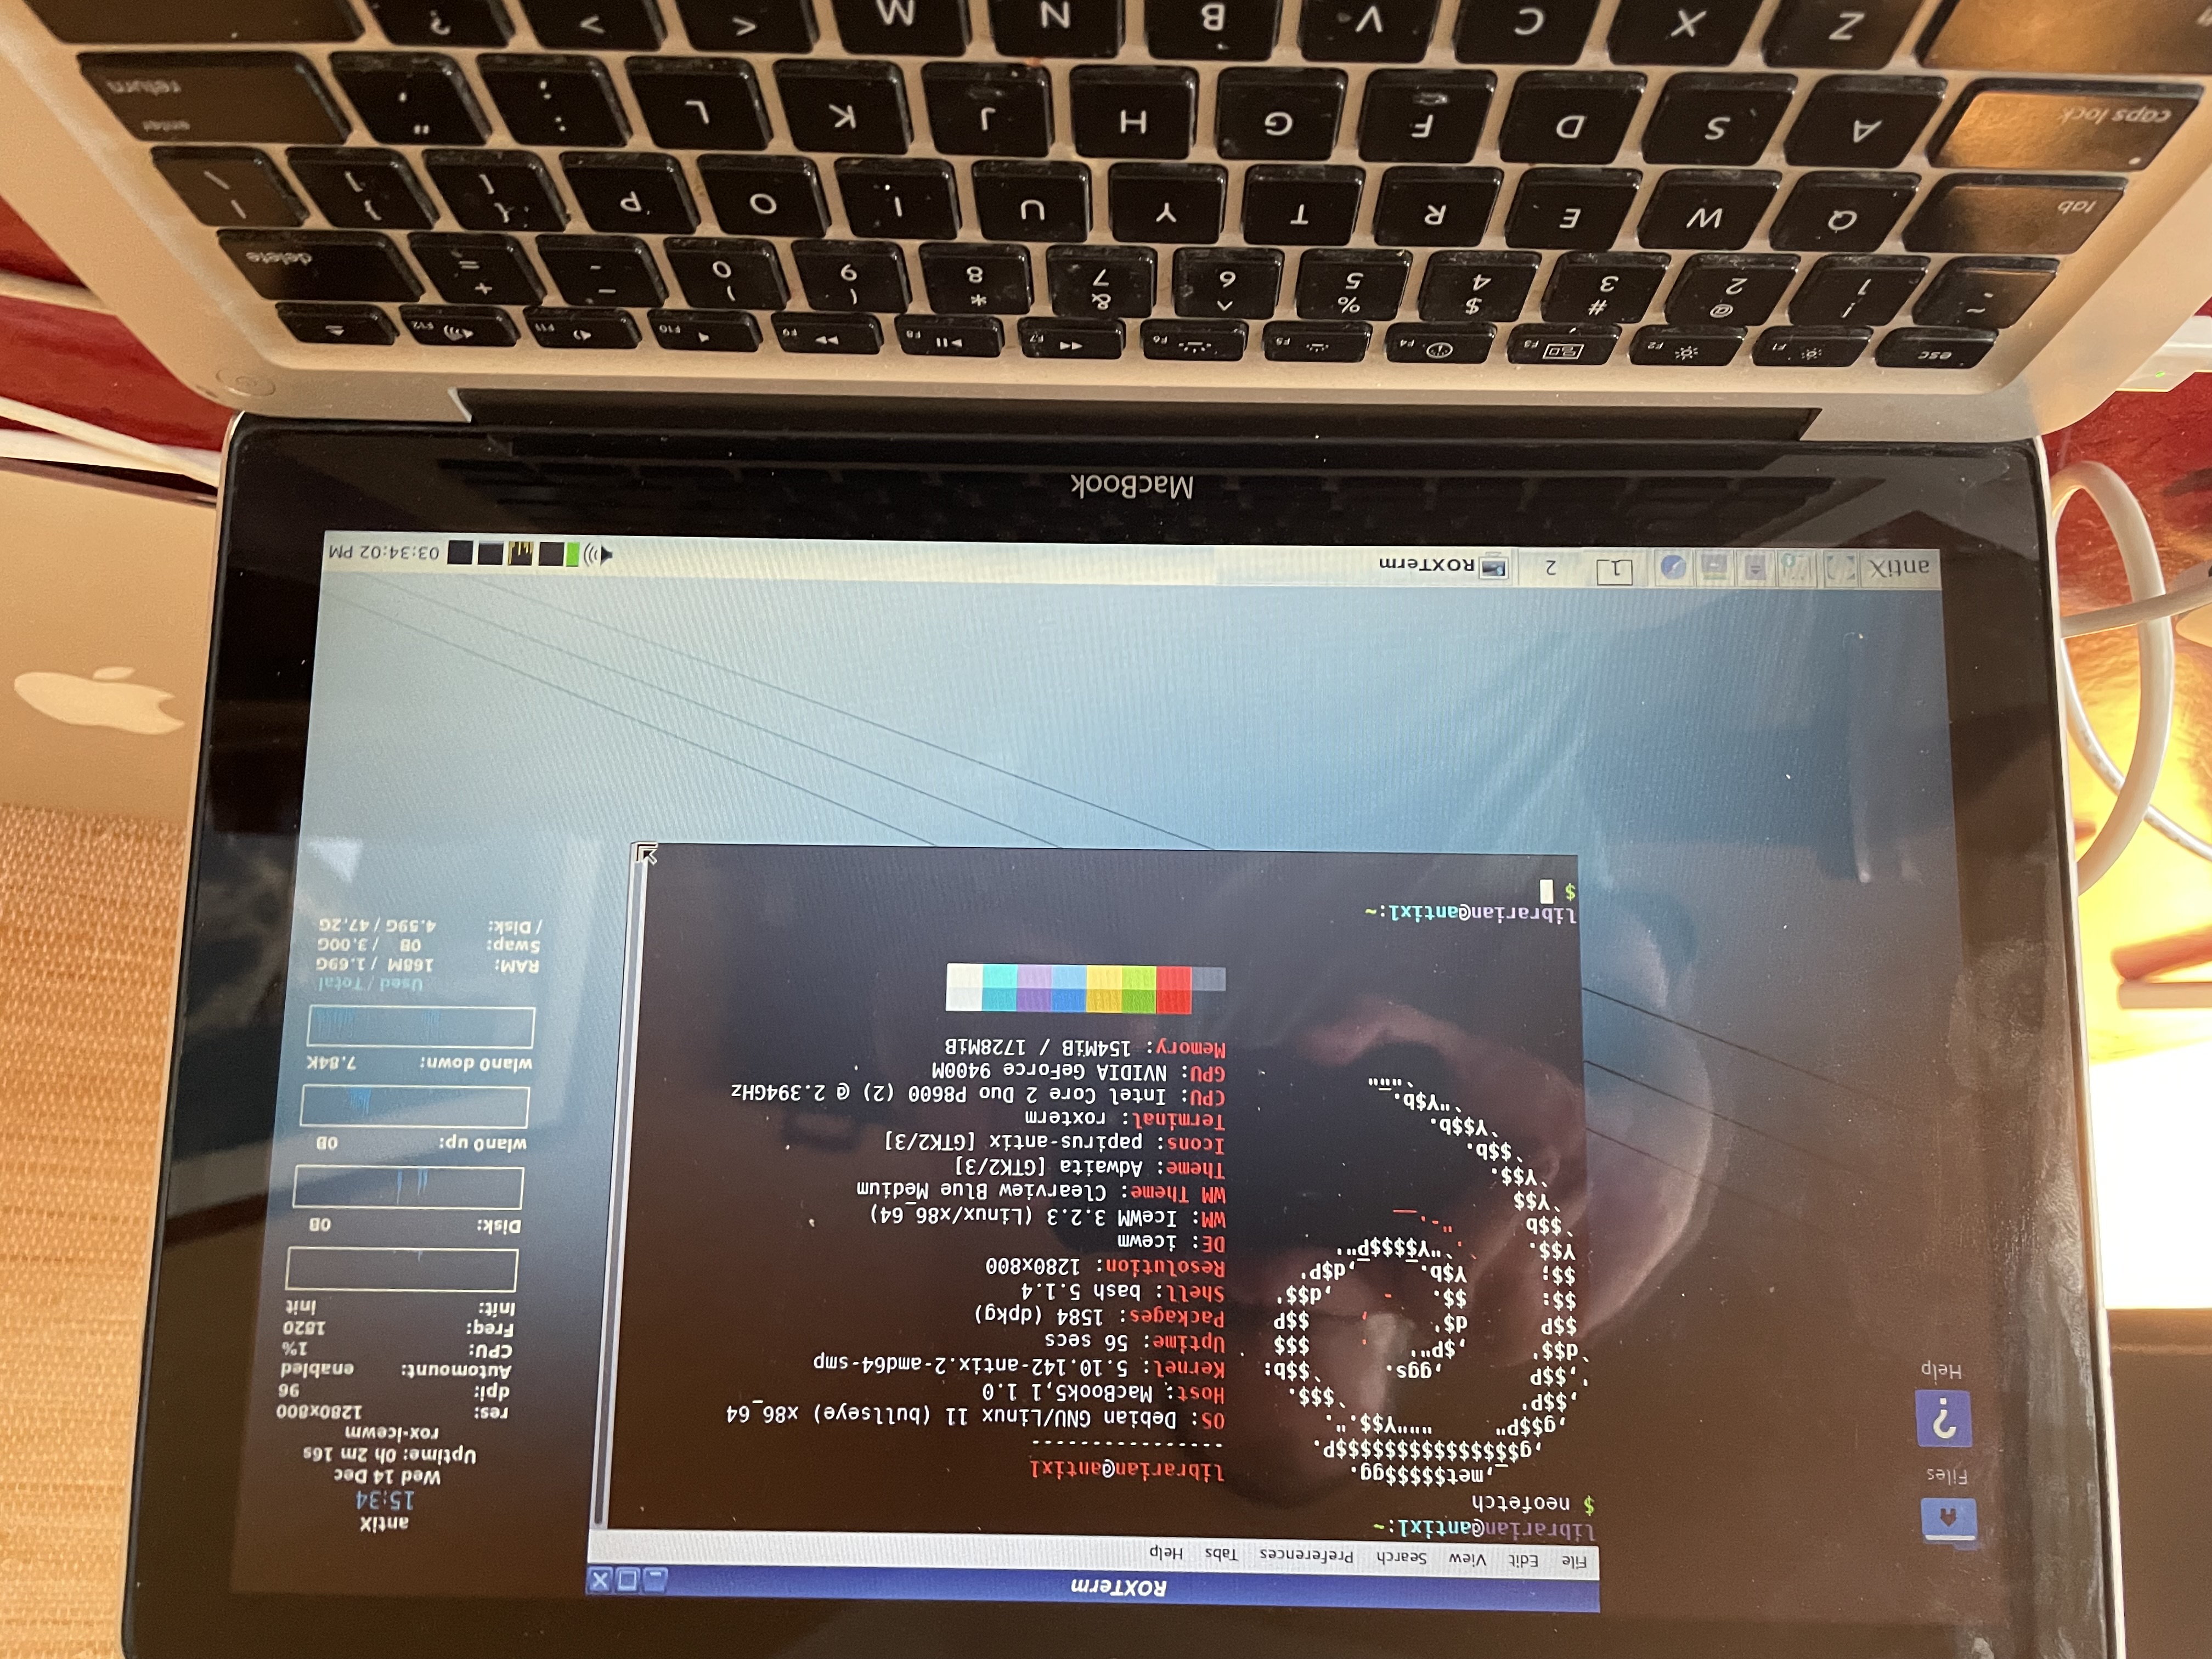
I had easier success with antiX and the rather beefy MacBook 5,1.
Using a USB stick with antiX 22 full/64-bit flashed, I rebooted the Macbook, holding alt/option when I heard the boot-up sound. I selected the EFI option and got to the now-familiar antiX boot screen. I hit ‘e’ to edit GRUB options and added nosplash, anticipating issues that I’d need information on, but the live demo GUI loaded right up! (Note that I don’t think antiX is using the NVIDIA graphics card…)
Excited, I clicked the GUI installer. Unfortunately, I think I hit an error around 12% of the way through the installation: something about an error while attempting to format the internal hard drive (/sda).
On a tip I found somewhere on the internet, I closed the installer and launched GParted, which is helpfully included in the antiX 22 live demo. This part below I’m not 100% sure on. Actually, it may misconfigure your hard drive in such a way that is difficult to recover from, so I would proceed with lots of CAUTION.
When you launch GParted in the antiX demo, it may ask for a system password. Apparently it’s demo (or maybe root).
Using GParted, I re-partitioned the hard drive to the following:
/dev/sda1as the boot partition. File system: ext4; Mount Point:/boot; Size: 2GB./dev/sda2as the root partition. File system: ext4; Mount Point:/; Label:rootantix22; Size: 48.3 GB (could likely get away with closer to 6GB, but I had plenty of storage to spare…)/dev/sda3as the swap partition. File system:linux-swap; Mount Point is blank(?); Label:swapantix; Size: 2.62 GB (think you want this to match size of system RAM? I gave it a bit extra just in case)/dev/sda4as the home partition. File system:ext4; Mount Point:/home; Label:home; Size: 179.7GB.
Then I clicked the check mark button at the top of GParted to have it do all this re-formatting, which took maybe 2 minutes. This had the bonus effect of deleting (maybe not very securely) the old data on the hard drive.
Once that was done, I relaunched the GUI antiX installer. I chose a custom install and, using drop-down menus, matched each partition with its assignment (root, swap, home, etc.). In the subsequent menus, I chose to, yes, install GRUB and to do it on MBR, which I think is important! (MBR is not the default.)
Once the installer was done, I rebooted the system and it launched right into antiX! Very cool.
Troubleshooting (at this point)
If, with the USB stick removed, you reboot the computer and it takes you to a command line login, don’t panic. Login in the credentials you set while installing antiX.
Once the prompt says <your_username>@<computername>, run sudo nano /etc/default/grub to edit GRUB setting. You’ll likely want them to match the settings you used to get the demo running (in my case, nosplash failsafe disable=lxF). Save the changes to the file (Ctrl-O, then enter) and exit nano (Ctrl-X), then run sudo update-grub to make the changes to the actual GRUB config files. Finally, run sudo reboot to restart the computer.
Note that, while the USB live demo uses the “Legacy” kernel, the installed version will try to use the latest kernel included in the antiX iso. So if you still have issues with the installed version of antiX that you didn’t with the live USB demo, it might be because of the use of the newer kernel. Currently, I’m not quite sure how to change this…
Using AntiX
On this old MacBook and its relatively low 2 GB of RAM, AntiX seems pretty perfect for my needs. The default IceWM window manager is lightweight but modern-looking. The stability of Debian and its familiar apt CLI tool is comforting. I loved the choice of many window managers, which ranged in their feel and resource usage (and it’s wonderful that you can switch between them “live”, with little delay). And the user forum was super helpful when I had questions.
I will note that the default UI (with the IceWM window manager) is definitely more Windows-inspired than Mac-inspired – for example, a lot of user actions start with clicking the “antiX” button in the bottom left, a la the Windows “Start” button. While this is great for folks coming from (older versions of) Windows, I was a bit slow to get used to it. There are (of course) ways to make antiX look more like Mac OS (see here and here), e.g. I could have added a dock like Plank, but I worried about increased RAM usage. Not a big deal.
I was also a bit confused about how to use antiX as a “live USB”, by which I understand you load it onto a USB stick and carry it around to fire up on any computer you might have access to. As I understand it (a) this type of USB is distinct from just loading up the ISO on a USB stick (maybe since it includes persistence of storage and/or preferences), and (b) the best/easiest way to create one of these special “live” USBs is to use a normal antiX-flashed USB? It was a bit confusing to me. FWIW, I encountered a similar confusion with Puppy Linux.
I can’t back this up with evidence, but in general I felt a bit more sure of myself dealing with MX Linux than with antiX.
The 2012 MacBook Air
I also had a MacBookAir5,2 (13-inch, mid 2012, 1.8 GHz Intel Core i5, 8 GB of DDR3 RAM) kicking around. Despite it being 5 years younger than these other two machines, I think it could only run macOS High Sierra, which is also no longer supported by Apple. Linux time!
Given the 8 GB of RAM, and my good experience with MX Linux, I went with MX’s “flagship” Xfce install. Installation went very smoothly – don’t think I even needed to edit the GRUB parameters. I even liked the theming out the box. So this section of this post is pretty short! Given its younger age and its 8 GB of RAM, this is a pretty capable machine now!
Most of the small changes I ended up making were from this great video on setting up and customizing MX+Xfce.
A group photo of all three
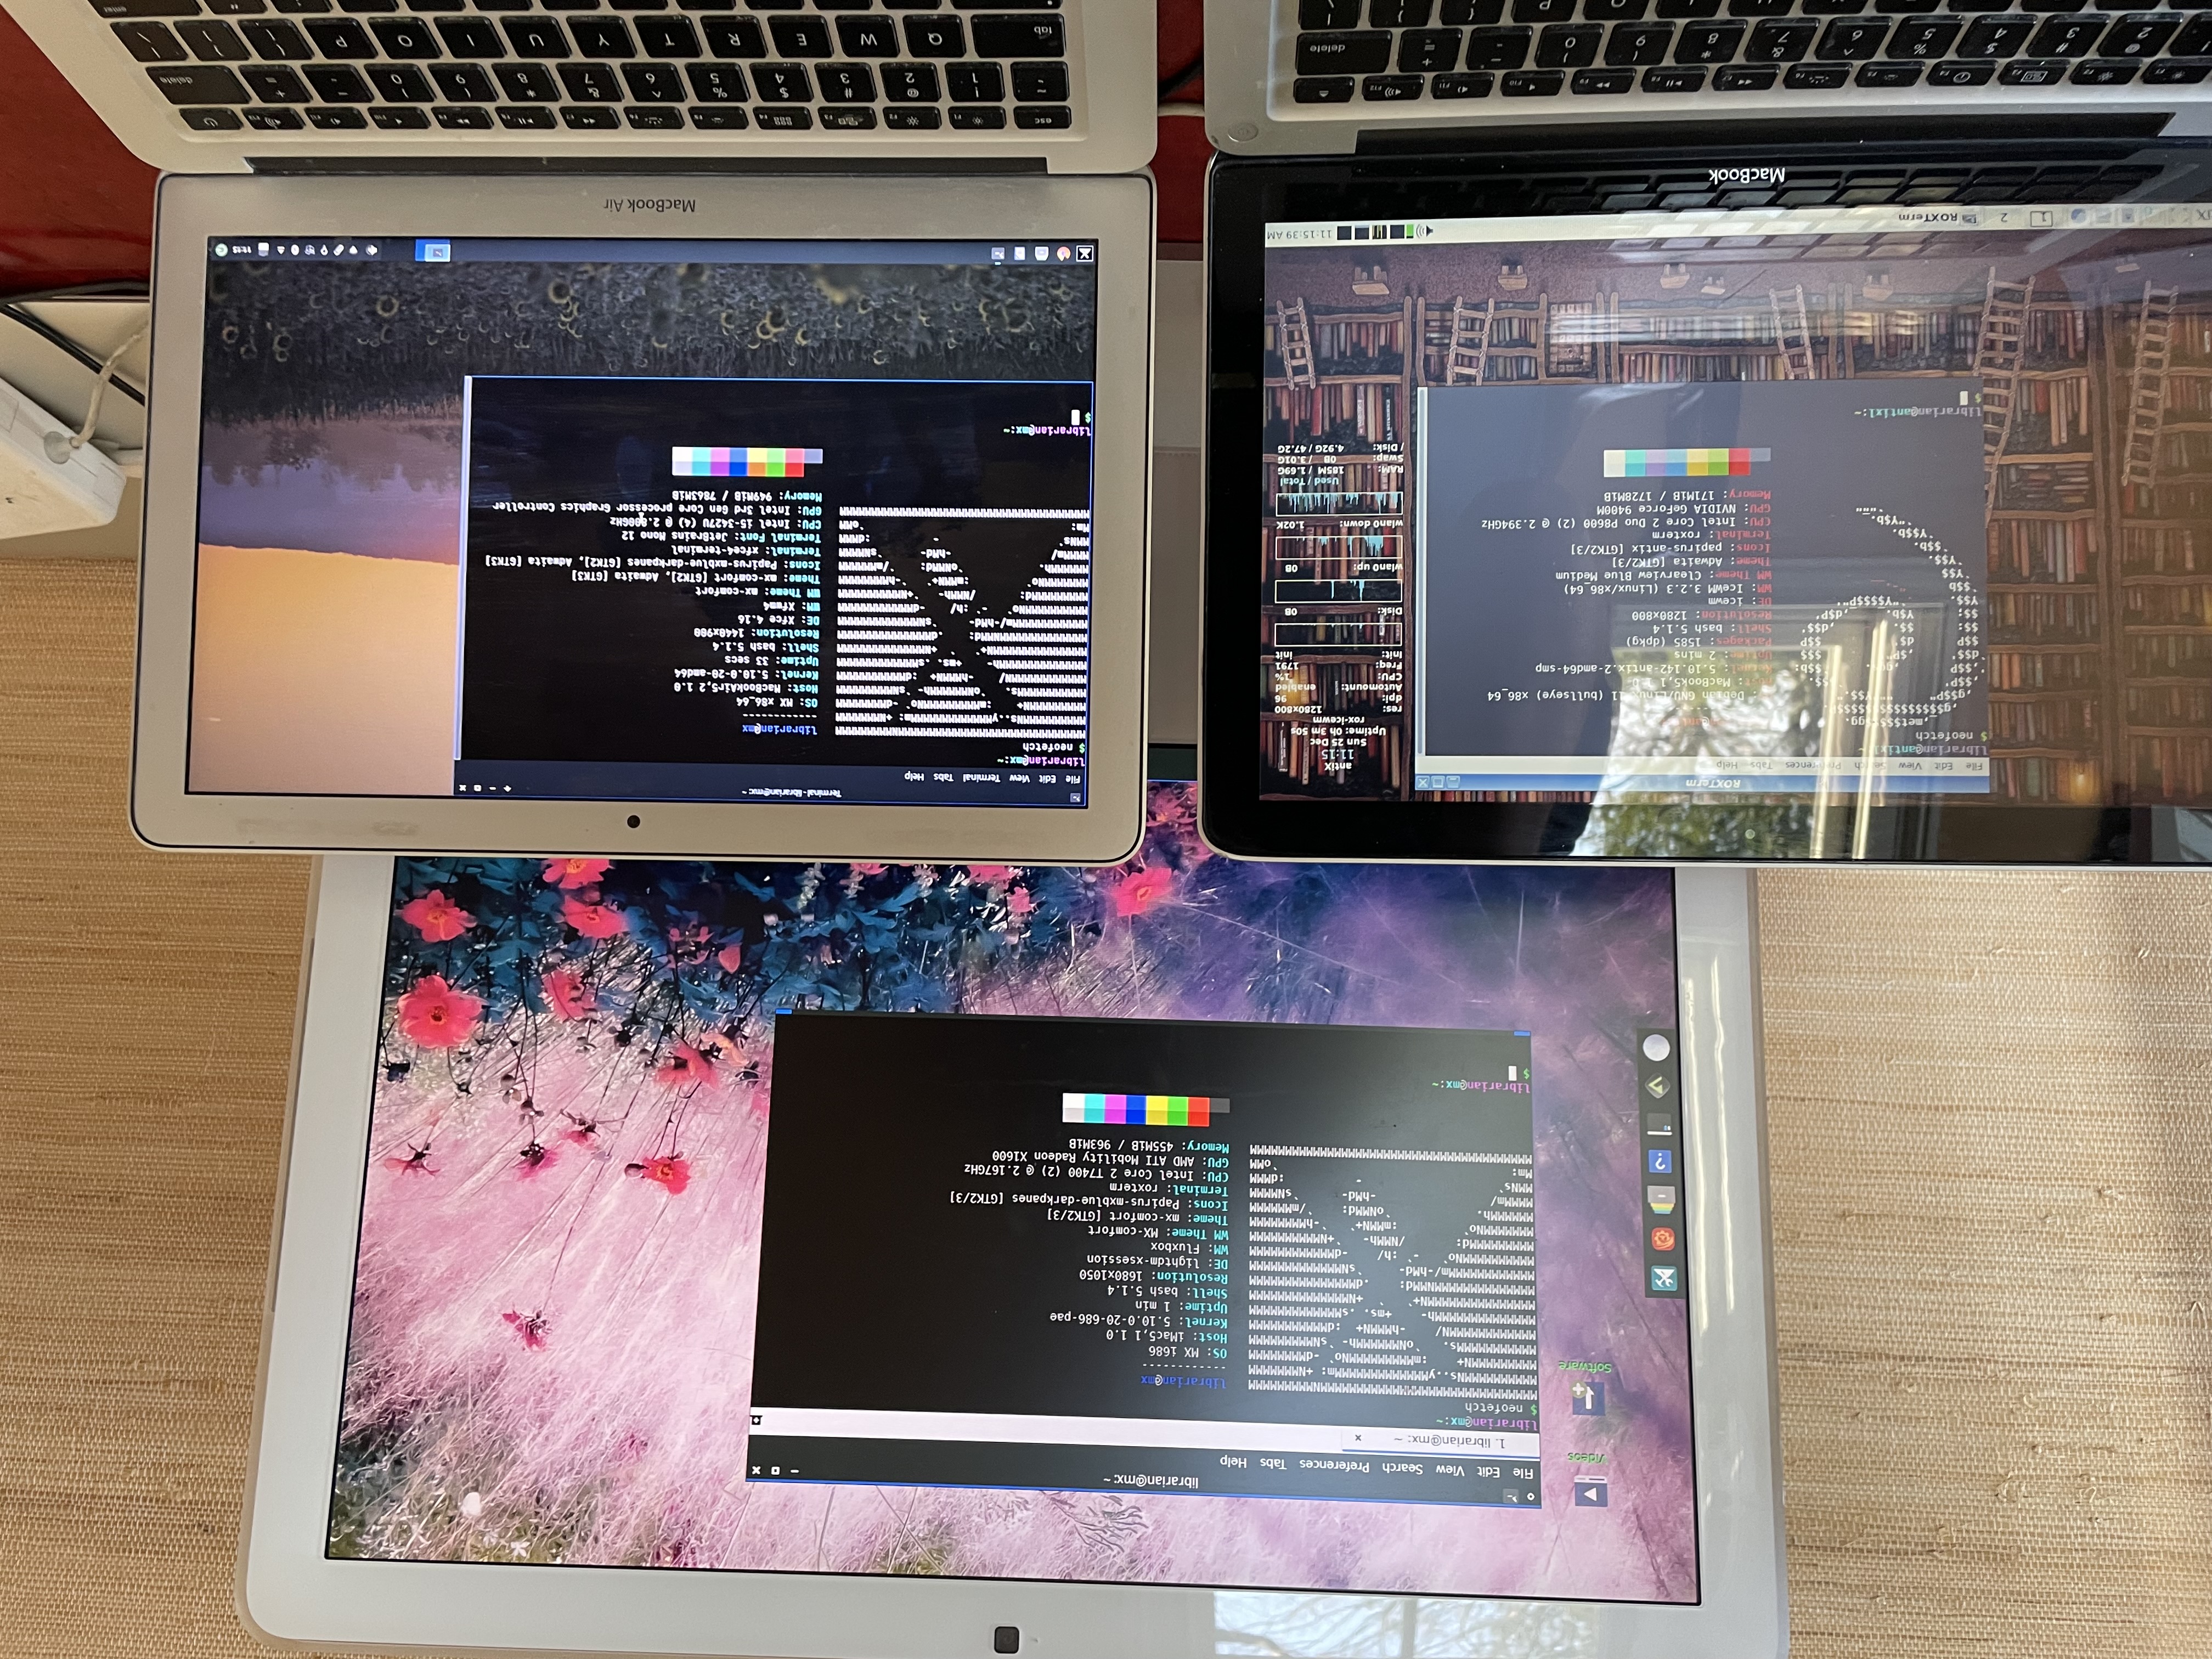
Phew! So to recap, I got:
- antiX (photographed using the IceWM desktop) on a MacBook5,1 (bottom left in photo, sorry about the glare)
- MX+Fluxbox on an iMac5,1 desktop (top middle)
- MX+Xfce on a MacBookAir5,2 (bottom right)
Appendix A: RAM-saving tweaks for antiX
Later on, I looked into some ways to conserve RAM on the MacBook5,1 with antiX on it. Here are some of the steps I took:
- AntiX specific: Run
sudo cp /usr/local/bin/zram /etc/init.d && sudo update-rc.d zram defaultthen reboot to enable zram at start-up. (source) - AntiX comes with Firefox ESR as the default browser. While I support that choice generally, it felt a bit heavy for my purposes, so I used the included package manager to install Pale Moon browser and made it the default and preferred browser. I also did this on the iMac. (I tried SeaMonkey first but it didn’t play audio out of the box and I didn’t feel like fixing that.)
- Try alternate desktops! AntiX makes it pretty darn easy to try other desktops: In fact, you can switch without rebooting or even logging out, something I don’t think I’ve seen before. In the antiX (Start) menu, you just go to Desktop and pick a desktop to try. I tried Minimal-IceWM desktop environment, which did lower RAM consumption, but removed, among other things, the GUI volume control in the bottom left of the main task bar (this gives you an idea of just how minimal the window manager is).
After taking these steps on the antiX MacBook, with the default terminal open, running free -m informs that I have 131MB used. With Pale Moon open and playing a YouTube video, usage bumps up to 485MB. Impressive!
Appendix B: Theming
Given how often I was re-installing distros this weekend, I couldn’t really bring myself to start working on a theme/aesthetic for the laptop (in case I had to soon after start over with a new installation or something). But I think that’d be a fun follow-up project.
The antiX forum has some posts about looks, including how to model it after macOS. For a dock for antiX, I might I’ve heard a lot about Plank, but have also seen that it eats about 25 mb of RAM.
I generally liked how MX Linux looks out of the box, especially the flagship Xfce version on the MacBook Air. The theme is called mx-comfort, and the icons are Papirus, an icon set I actually had admired and used before.
If you know of any other RAM-saving techniques or other lightweight Linux distros you like, feel free to let me know!
Epilogue: A Lesson Learned
Brimming with confidence, I tried to install antiX on yet another old Mac: a MacBook Pro 3,1, which was still running Ubuntu 16.04 from this post.
After a couple of failed boots and install attempts (the last of which was trying to use antiX 19.5 because apparently I could get the right Nvidia driver (legacy-340xx) with Debian Buster?), I seem to have somehow deleted or corrupted GRUB. I think during one of my failed install attempts, I unchecked the box to “install GRUB” (still wondering why that’s possible?). Either that or I told the installer to install GRUB on a partition that didn’t exist?
Recovering
This situation was, for me, very tricky and frustrating to recover from. Eventually, I used the antiX 22 live demo to install a fresh copy of antiX 22, paying special attention to create a partition for “/boot” and telling the installer to install GRUB on “MBR”. I think this did what I wanted: give me a clean installation of GRUB and a /boot partition upon which to install an “easier” distro that would hopefully clean up the remaining artifacts from my failed antiX install.
So, rather than try to boot antiX again (it hadn’t been working on that machine), I stuck in a different USB that I had flashed with a simpler (but still lightweight) distro called Bodhi Linux, one I had wanted to try anyway. I figured an easy-to-install distro (based on Ubuntu) would install easily AND hopefully resolve any remaining issues from my failed antiX installations.
Sure enough, after a bit longer than I would have guessed, Bodhi Linux installed successfully! I ran a sudo apt update && sudo apt dist-upgrade to get it up-to-date, then crossed my fingers and rebooted. I don’t think I had to use any special GRUB boot parameters. All good!

My takeaway here is that antiX is not advertised as a beginner-friendly distro for a reason. (I was relieved that the Bodhi Linux installer didn’t ask me any confusing questions!) If you’re not paying attention, it can bite ya! MX Linux may be a bit more beginner friendly, but you still need to read the installation wizard carefully!
Appendix C: Resources and notes
- Linux DVD images (and how-to) for 32-bit EFI Macs (late 2006 models)
- I also am wondering if performance on some or all of these machines would be significantly improved if I had taken the time to find the correct drivers for their GPUs. A fediverse friend points me to NVIDIA driver 304.108.
Update from April 2023: List of lightweight Linux distros from It’s Floss.
Lastly, this post garnered some comments on Hacker News.